实验环境:
- 使用两台 Cisco 2811 路由器,IOS 是目前最新的 c2800nm-adventerprisek9-mz.151-4.M10.bin
- 还有两台 Cisco 3750 三层交换机,IOS 是目前最新的 c3750-ipservicesk9-mz.122-55.SE10.bin
实验来源:
该实验将会有四个小实验,而这四个小实验都来自于这篇文章:《DHCP snooping详解》。
PS:在这里还要特别感谢一下红茶三杯,是他写的这篇文章,而 Ricky 将会用真机实现这篇文章中提到的四个 DHCP snooping 小实验。
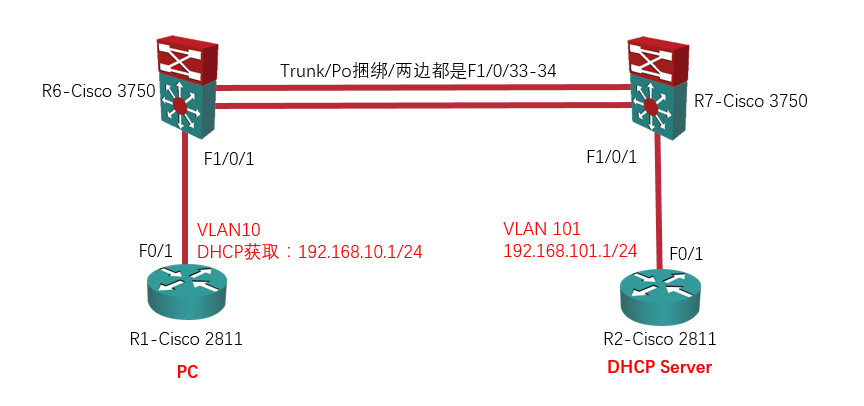
实验 1 — 基础实验:
- PC 属于 VLAN 10,网关在 R7 上;
- DHCP Server 属于 VLAN 101,网关也在 R7 上;
- R6 为接入层交换机,部署 DHCP snooping,将 F1/0/33 – 34 定义为 trust 接口;
- 这个实验需要注意的是,R6 上是不插入 option 82 的(通过配置命令:no ip dhcp snooping information option 实现)。
| R1 – Cisco 2811:
no ip routing int f 0/1 |
R2 – Cisco 2811:
no ip routing int f 0/1 service dhcp |
| R6 – Cisco 3750:
vlan 10 ip dhcp snooping int f 1/0/1 int r f 1/0/33-34 int po 1 |
R7 – Cisco 3750:
vlan 10 int f 1/0/1 int r f 1/0/33-34 int vlan 10 int vlan 101 |
现在我们先来看看 DHCP Server 能不能 ping 通它的网关:
R2#p 192.168.101.254
Type escape sequence to abort.
Sending 5, 100-byte ICMP Echos to 192.168.101.254, timeout is 2 seconds:
!!!!!
Success rate is 100 percent (5/5), round-trip min/avg/max = 1/3/8 ms
OK,没有问题。
接着我们去 PC 上通过 DHCP 获取一下 IP 地址(注意:f 0/0 口上的 192.168.199.0/24 网段是我用来 Telnet 的接口,下同):
R1#renew dhcp f 0/1        // 在 R1 上重新通过 DHCP 获取 f 0/1 口上的 IP 地址

R1#sh ip int bri
Interface              IP-Address      OK? Method Status                Protocol
FastEthernet0/0        192.168.199.11  YES NVRAM  up                    up
FastEthernet0/1        192.168.10.1    YES DHCP   up                    up
Serial0/0/0            12.1.1.1        YES NVRAM  administratively down down
Serial0/0/1            14.1.1.1        YES NVRAM  administratively down down
Serial0/1/0            13.1.1.1        YES NVRAM  administratively down down
Serial0/3/0            unassigned      YES NVRAM  administratively down down
OK,通过 DHCP 获取到 IP 地址了。
在 DHCP Server 上查看 DHCP 绑定表:
R2#sh ip dhcp binding
Bindings from all pools not associated with VRF:
IP address          Client-ID/              Lease expiration        Type
                    Hardware address/
                    User name
192.168.10.1        0063.XXXX.XXXX.2d30.    Dec 16 2016 03:06 PM    Automatic
                    3031.XXXX.XXXX.3061.
                    2e31.XXXX.XXXX.4661.
                    302f.31
在接入层交换机 R6 上查看 DHCP snooping 的绑定表:
R6#sh ip dhcp snooping binding
MacAddress         IpAddress    Lease(sec) Type          VLAN Interface
------------------ ------------ ---------- ------------- ---- ------------------
00:XX:XX:XX:XX:79  192.168.10.1 86136      dhcp-snooping  10   FastEthernet1/0/1
Total number of bindings: 1
PC 现在也可以 ping 通自己的网关了:
R1#p 192.168.10.254
Type escape sequence to abort.
Sending 5, 100-byte ICMP Echos to 192.168.10.254, timeout is 2 seconds:
.!!!!
Success rate is 80 percent (4/5), round-trip min/avg/max = 1/1/1 ms
实验 2 — 接入层交换机插入 option 82,汇聚层交换机做 DHCP 中继:
在实验 1 的基础上:
- 在接入层交换机 R6 上插入 option 82;
- 因为在接入层交换机 R6 上插入了 option 82,所以在汇聚层交换机 R7 上就需要配置 DHCP relay(DHCP 中继)了。
首先,我们先让接入层交换机 R6 插入 option 82:
R6(config)#ip dhcp snooping information option
然后在 R7 上开启 debug 信息:
R7#debug ip dhcp snooping event
DHCP Snooping Event debugging is on

R7#debug ip dhcp snooping packet
DHCP Snooping Packet debugging is on

R7#debug ip dhcp server packet
DHCP server packet debugging is on.

R7#debug ip dhcp server events
DHCP server event debugging is on.
因为是真机实验,而且 Ricky 是 Telnet 上 Cisco 3750 三层交换机的,而默认情况下 Telnet 是不显示 debug 信息的,所以还需要这么做:
Telnet 到 Cisco 设备的终端模式无法显示本地串口模式下的 debug 信息,需要使用以下命令:

打开终端显示:
R7#terminal monitor

打开日志功能:
R7(config)#logging on

设置日志级别为 debug 模式(7 为 debug 模式):
R7(config)#logging monitor 7

通过以上三条命令就可以在 Telnet 终端下看到 debug 的打印信息了。
现在你会发现在 R7 上报了一些有关于 DHCP 的错误,而且 PC 现在是获取不到 IP 地址的。
先释放掉通过 DHCP 获取到的 IP 地址:
R1#release dhcp f 0/1     // 在 R1 上释放掉在 f 0/1 口上通过 DHCP 获取到的 IP 地址

R1#sh ip int bri
Interface              IP-Address      OK? Method Status                Protocol
FastEthernet0/0        192.168.199.11  YES NVRAM  up                    up
FastEthernet0/1        unassigned      YES DHCP   up                    up
Serial0/0/0            12.1.1.1        YES NVRAM  administratively down down
Serial0/0/1            14.1.1.1        YES NVRAM  administratively down down
Serial0/1/0            13.1.1.1        YES NVRAM  administratively down down
Serial0/3/0            unassigned      YES NVRAM  administratively down down
然后在 PC 上通过 DHCP 重新获取一下 IP 地址,此时你会发现在 R7 上出现了以下 debug 信息:
R1#renew dhcp f 0/1       // 在 R1 上重新通过 DHCP 获取 f 0/1 口上的 IP 地址
Not in Bound state.

以下 debug 信息来自 R7:
00:38:32: DHCPD: Reload workspace interface Vlan10 tableid 0.
00:38:32: DHCPD: tableid for 192.168.10.254 on Vlan10 is 0
00:38:32: DHCPD: client's VPN is .
00:38:32: DHCPD: inconsistent relay information.
00:38:32: DHCPD: relay information option exists, but giaddr is zero.
00:38:36: DHCPD: Reload workspace interface Vlan10 tableid 0.
00:38:36: DHCPD: tableid for 192.168.10.254 on Vlan10 is 0
......
relay information option exists, but giaddr is zero. —— 这段英文的意思是该汇聚层交换机发现了中继选项信息(option 82)的存在,但是 giaddr 字段是零(giaddr 字段的意思是该报文经过的第一个 DHCP 中继代理的 IP 地址),而思科的设备发现 giaddr 字段是零时,默认会丢弃这个 DHCP 的数据包。
现在我们就需要在汇聚层交换机 R7 上配置 DHCP 中继:
全局配置模式下配置:
ip dhcp relay information trust-all

或在接口模式下配置:
interface vlan 10
ip dhcp relay information trusted
配置上述任一一条命令即可。Ricky 这里选择的是在接口模式下配置:
R7(config)#interface vlan 10
R7(config-if)#ip dhcp relay information trusted
上述命令,将使交换机接受携带 option 82 的信息,同时 giaddr 为 0 的 DHCP 报文,然后做 DHCP 中继。如此一来 PC 便可成功获取到 IP 地址。
R1#renew dhcp f 0/1

R1#sh ip int bri
Interface              IP-Address      OK? Method Status                Protocol
FastEthernet0/0        192.168.199.11  YES NVRAM  up                    up
FastEthernet0/1        192.168.10.1    YES DHCP   up                    up
Serial0/0/0            12.1.1.1        YES NVRAM  administratively down down
Serial0/0/1            14.1.1.1        YES NVRAM  administratively down down
Serial0/1/0            13.1.1.1        YES NVRAM  administratively down down
Serial0/3/0            unassigned      YES NVRAM  administratively down down
实验 3 — 接入层交换机插入 option 82,上游汇聚层交换机也开启 DHCP Snooping:
在实验 2 的基础上:
- 在接入层交换机 R6 上开启 DHCP Snooping,同时插入 option 82(这是实验 2 的需求);
- 在汇聚层交换机 R7 上也开启 DHCP Snooping 。
汇聚层交换机 R7 也开启 DHCP Snooping,默认所有端口都是 untrust 的,这时如果 R7 的 f 1/0/33 – 34 口收到携带了 option 82 的 DHCP 报文,则丢弃。解决办法之一,是将 R7 的 f 1/0/33 – 34 口配置为 trust 接口,但是这么一来通过该 trust 接口收到的 DHCP 报文,是不会创建 DHCP Snooping binding 表项的。另一个方法是,使用命令:ip dhcp snooping information option allow-untrusted,这条命令放行携带了 option 82 的 DHCP 报文,同时会在本地创建 DHCP Snooping binding 表项。
在实验 2 的基础上接着配置,先在汇聚层交换机 R7 上开启 DHCP Snooping,然后放行携带了 option 82 的 DHCP 报文:
R7(config)#ip dhcp snooping
R7(config)#ip dhcp snooping vlan 10

R7(config)#ip dhcp snooping information option allow-untrusted
先释放掉通过 DHCP 获取到的 IP 地址:
R1#release dhcp f 0/1

R1#sh ip int bri
Interface              IP-Address      OK? Method Status                Protocol
FastEthernet0/0        192.168.199.11  YES NVRAM  up                    up
FastEthernet0/1        unassigned      YES DHCP   up                    up
Serial0/0/0            12.1.1.1        YES NVRAM  administratively down down
Serial0/0/1            14.1.1.1        YES NVRAM  administratively down down
Serial0/1/0            13.1.1.1        YES NVRAM  administratively down down
Serial0/3/0            unassigned      YES NVRAM  administratively down down
然后在 PC 上通过 DHCP 重新获取一下 IP 地址:
R1#renew dhcp f 0/1
Not in Bound state.

R1#sh ip int bri
Interface              IP-Address      OK? Method Status                Protocol
FastEthernet0/0        192.168.199.11  YES NVRAM  up                    up
FastEthernet0/1        192.168.10.1    YES DHCP   up                    up
Serial0/0/0            12.1.1.1        YES NVRAM  administratively down down
Serial0/0/1            14.1.1.1        YES NVRAM  administratively down down
Serial0/1/0            13.1.1.1        YES NVRAM  administratively down down
Serial0/3/0            unassigned      YES NVRAM  administratively down down
OK,没有问题。
我们现在在汇聚层交换机 R7 上查看一下 DHCP snooping 的绑定表:
R7#sh ip dhcp snooping binding
MacAddress        IpAddress    Lease(sec) Type          VLAN Interface
----------------- ------------ ---------- ------------- ---- --------------
00:XX:XX:XX:XX:79 192.168.10.1 86136      dhcp-snooping  10   Port-channel1
Total number of bindings: 1
实验 4 — 无 DHCP 中继环境中,option 82 及相关问题:
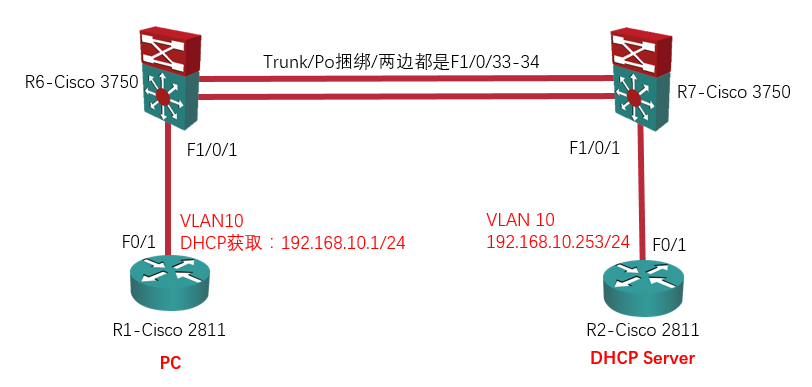
这个环境比较简单,PC 与 DHCP Server 同处一个 VLAN,我主要想证实一下普通交换机对携带了 option 82 的 DHCP 数据包的处理情况。
- R6 仍然开启 DHCP Snooping,同时插入 option 82;
- R7 将 DHCP Server 划入与 PC 相同的 VLAN,相当于纯做透传。
| R1 – Cisco 2811:
no ip routing int f 0/1 |
R2 – Cisco 2811:
no ip routing int f 0/1 service dhcp |
| R6 – Cisco 3750:
vlan 10 ip dhcp snooping int f 1/0/1 int r f 1/0/33-34 int po 1 |
R7 – Cisco 3750:
vlan 10 int f 1/0/1 int r f 1/0/33-34 int vlan 10 |
现在 Ricky 在 PC 上通过 DHCP 获取一下 IP 地址:
R1#renew dhcp f 0/1
Not in Bound state.

R1#sh ip int bri
Interface              IP-Address      OK? Method Status                Protocol
FastEthernet0/0        192.168.199.11  YES NVRAM  up                    up
FastEthernet0/1        unassigned      YES DHCP   up                    up
Serial0/0/0            12.1.1.1        YES NVRAM  administratively down down
Serial0/0/1            14.1.1.1        YES NVRAM  administratively down down
Serial0/1/0            13.1.1.1        YES NVRAM  administratively down down
Serial0/3/0            unassigned      YES NVRAM  administratively down down
你会发现 PC 上获取不到 IP 地址。
如果我们在 R7 上 debug 一下:
R7#debug ip dhcp snooping event
DHCP Snooping Event debugging is on

R7#debug ip dhcp snooping packet
DHCP Snooping Packet debugging is on

R7#debug ip dhcp server packet
DHCP server packet debugging is on.

R7#debug ip dhcp server events
DHCP server event debugging is on.
你会发现出现了跟实验 2 一样的错误:
00:13:01: DHCPD: Reload workspace interface Vlan10 tableid 0.
00:13:01: DHCPD: tableid for 192.168.10.254 on Vlan10 is 0
00:13:01: DHCPD: client's VPN is .
00:13:01: DHCPD: inconsistent relay information.
00:13:01: DHCPD: relay information option exists, but giaddr is zero.
R7 作为透传设备,虽然 R7 发现 giaddr 字段为零,但此时 R7 并没有丢弃这个数据包,而是将数据包继续传递给了 DHCP Server 。现在我们在 DHCP Server 上也 debug 一下:
R2#debug ip dhcp server packet
DHCP server packet debugging is on.

R2#debug ip dhcp server events
DHCP server event debugging is on.
接着让 PC 通过 DHCP 获取一下 IP 地址:
R1#renew dhcp f 0/1
Not in Bound state.
在 DHCP Server 上你会看到下面的 debug 信息,DHCP Server 也发现 giaddr 字段为零,所以最终是 DHCP Server 丢弃了这个 DHCP 数据包(或者说 DHCP Server 忽略了这个 DHCP 请求):
*Dec 15 17:05:52.959: DHCPD: inconsistent relay information.
*Dec 15 17:05:52.959: DHCPD: relay information option exists, but giaddr is zero.
*Dec 15 17:05:56.159: DHCPD: inconsistent relay information.
*Dec 15 17:05:56.159: DHCPD: relay information option exists, but giaddr is zero.
*Dec 15 17:06:00.159: DHCPD: inconsistent relay information.
*Dec 15 17:06:00.159: DHCPD: relay information option exists, but giaddr is zero.
解决办法有两种:
- 第一种是在 R6 上配置下面这条命令,让 R6 不插入 option 82 信息:
R6(config)#no ip dhcp snooping information option
- 第二种是在 DHCP Server 上配置 DHCP 中继:
全局配置模式下配置:
ip dhcp relay information trust-all

或在接口模式下配置:
int f 0/1
ip dhcp relay information trusted
现在 Ricky 采用第二种方法,在全局模式下配置命令 ip dhcp relay information trust-all:
R2(config)#ip dhcp relay information trust-all
现在,PC 可以获取到 IP 地址了:
R1#renew dhcp f 0/1
Not in Bound state.

R1#sh ip int bri
Interface              IP-Address      OK? Method Status                Protocol
FastEthernet0/0        192.168.199.11  YES NVRAM  up                    up
FastEthernet0/1        192.168.10.1    YES DHCP   up                    up
Serial0/0/0            12.1.1.1        YES NVRAM  administratively down down
Serial0/0/1            14.1.1.1        YES NVRAM  administratively down down
Serial0/1/0            13.1.1.1        YES NVRAM  administratively down down
Serial0/3/0            unassigned      YES NVRAM  administratively down down
PC 现在也可以 ping 通自己的网关了:
R1#p 192.168.10.254
Type escape sequence to abort.
Sending 5, 100-byte ICMP Echos to 192.168.10.254, timeout is 2 seconds:
.!!!!
Success rate is 80 percent (4/5), round-trip min/avg/max = 1/1/1 ms
本文完。如有疑问,欢迎在下方留言;如本文有什么错误,欢迎在下方留言指正,谢谢。
发表评论?