安装:
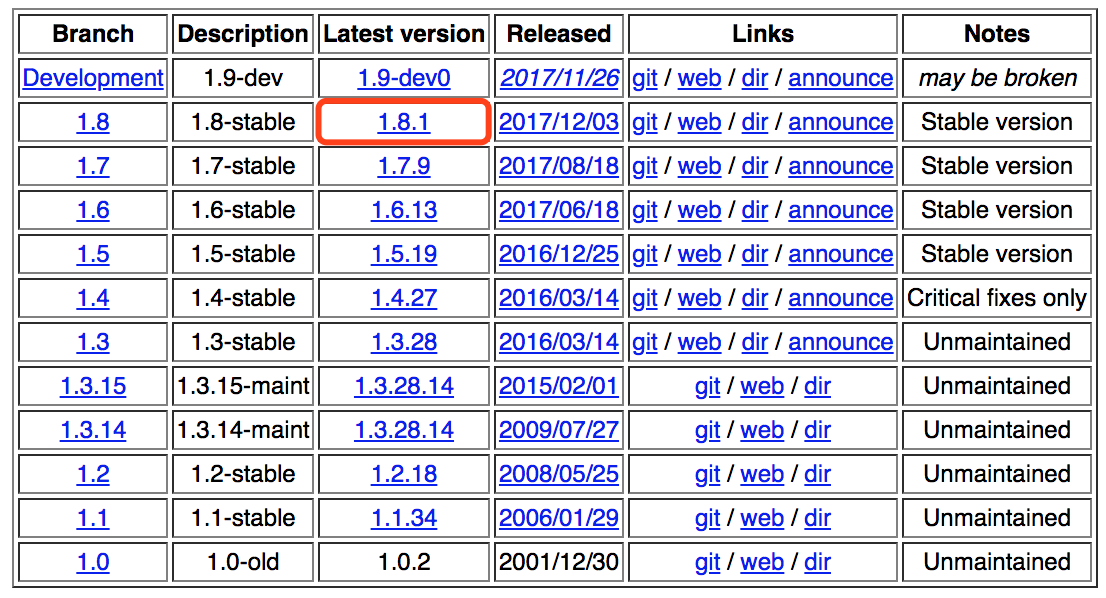
1 、先去官网下载最新版的 HAProxy :
如下图所示,复制 HAProxy 的下载链接:
2 、进入你的 CentOS ,先使用 yum 安装 wget 和 HAProxy 的依赖包 openssl-devel(如果已经安装过,可忽略这步):
[root@host ~]# yum -y install wget openssl-devel
3 、Ricky 个人是喜欢把一些临时文件放到 /tmp 目录下,所以进入 /tmp 目录,使用 wget 命令把 HAProxy 的 tar.gz 包下载到这里,然后解压(或者下载到 PC 后,再通过 FTP 上传至 CentOS Linux ):
[root@host ~]# cd /tmp
[root@host tmp]# wget http://www.haproxy.org/download/1.8/src/haproxy-1.8.1.tar.gz
[root@host tmp]# tar -zxvf haproxy-1.8.1.tar.gz
4 、查看一下当前 CentOS 的内核版本(如下例所示,内核版本为 2.6 ):
[root@host tmp]# uname -a
Linux host.localdomain 2.6.32-042stab123.3 #1 SMP Fri May 5 12:29:05 MSK 2017 x86_64 x86_64 x86_64 GNU/Linux
[root@host tmp]#
5 、进入解压出来的文件夹,在这里执行编译安装操作(由上可知内核版本号为 2.6,所以这里 TARGET 是 linux26 ;因为是 64 位的 Linux 系统,所以 ARCH=X86_64 ):
[root@host tmp]# cd haproxy-1.8.1/
[root@host haproxy-1.8.1]# make TARGET=linux26  ARCH=X86_64 PREFIX=/usr/local/haproxy USE_OPENSSL=1 ADDLIB=-lz
[root@host haproxy-1.8.1]# make install PREFIX=/usr/local/haproxy
6 、删除掉这个文件夹,并创建 conf 文件夹:
[root@host haproxy-1.8.1]# cd ..
[root@host tmp]# rm -rf haproxy-1.8.1/
[root@host tmp]# mkdir /usr/local/haproxy/conf/
7 、同时还要创建一个文件夹,如果没有这个文件夹,HAProxy 打开的时候可能会报错:
[root@host tmp]# mkdir /var/lib/haproxy/
8 、生成 HAProxy 的配置文件:
[root@host tmp]# vi /usr/local/haproxy/conf/haproxy.conf
键入小写字母 i ,进入编辑模式,将以下配置复制粘贴进去:
global
    log         127.0.0.1 local2

    chroot      /var/lib/haproxy
    pidfile     /var/run/haproxy.pid
    maxconn     4000
    user        haproxy
    group       haproxy
    daemon
    tune.ssl.default-dh-param 2048

    stats socket /var/lib/haproxy/stats

defaults
    mode                    http
    log                     global
    option                  httplog
    option                  dontlognull
    option http-server-close
    option forwardfor       except 127.0.0.0/8
    option                  redispatch
    retries                 3
    timeout http-request    10s
    timeout queue           1m
    timeout connect         10s
    timeout client          1m
    timeout server          1m
    timeout http-keep-alive 10s
    timeout check           10s
    maxconn                 3000

frontend  main *:5000
    acl url_static       path_beg       -i /static /images /javascript /stylesheets
    acl url_static       path_end       -i .jpg .gif .png .css .js

    use_backend static          if url_static
    default_backend             app

backend static
    balance     roundrobin
    option      httpchk
    server      static 127.0.0.1:4331 check

backend app
    balance     roundrobin
    option      httpchk
    server      app1 127.0.0.1:5001 check
    server      app2 127.0.0.1:5002 check
    server      app3 127.0.0.1:5003 check
    server      app4 127.0.0.1:5004 check
按一次 ESC 键退出编辑模式,然后键入 “ :wq ” 保存并退出。
9 、把 HAProxy 的启动脚本添加到开机自启动(还要给 rc.local 文件添加可执行权限,如果已添加可忽略),并执行 HAProxy 的启动脚本即可:
(1)给 rc.local 文件添加可执行权限:
[root@host tmp]# chmod +x /etc/rc.d/rc.local
[root@host tmp]# chmod +x /etc/rc.local

(2)把 HAProxy 的启动脚本添加到开机自启动:
[root@host tmp]# echo "/usr/local/haproxy/sbin/haproxy -f /usr/local/haproxy/conf/haproxy.conf" >> /etc/rc.local

(3)执行 HAProxy 的启动脚本:
[root@host tmp]# /usr/local/haproxy/sbin/haproxy -f /usr/local/haproxy/conf/haproxy.conf
至此,安装完成。
可能出现的错误:
HAProxy 启动时提示 “ cannot bind socket ” ,启动失败。
可以尝试键入以下命令来解决:
[root@host ~]# echo "net.ipv4.ip_nonlocal_bind=1" >> /etc/sysctl.conf

[root@host ~]# rm -f /sbin/modprobe
[root@host ~]# ln -s /bin/true /sbin/modprobe
[root@host ~]# rm -f /sbin/sysctl
[root@host ~]# ln -s /bin/true /sbin/sysctl

[root@host ~]# sysctl -p
使用:
1 、对 HAProxy 配置文件的语法做检查:
[root@host ~]# /usr/local/haproxy/sbin/haproxy -c -f /usr/local/haproxy/conf/haproxy.conf
2 、开启 HAProxy 的进程:
[root@host ~]# /usr/local/haproxy/sbin/haproxy -f /usr/local/haproxy/conf/haproxy.conf
3 、查看 HAProxy 的进程:
[root@host ~]# ps -ef | grep haproxy
root       613     1  0 Dec16 ?        00:00:54 /usr/local/haproxy/sbin/haproxy -f /usr/local/haproxy/conf/haproxy.conf
root      1142  1116  0 18:26 pts/0    00:00:00 grep haproxy
[root@host ~]#
4 、关闭(杀死)HAProxy 的进程:
[root@host ~]# killall haproxy
如果 CentOS Linux 提示没有 killall 命令,请使用 yum 安装 psmisc :
[root@host ~]# yum -y install psmisc
或者使用如下命令关闭(杀死)HAProxy 的进程:
[root@host ~]# ps aux|grep "haproxy" |grep -v grep|awk '{print $2}'|xargs kill -9
5 、查询 HAProxy 的版本号:
[root@host ~]# /usr/local/haproxy/sbin/haproxy -v
HA-Proxy version 1.8.4-1deb90d 2018/02/08
Copyright 2000-2018 Willy Tarreau <willy@haproxy.org>

[root@host ~]#
配置:
1 、修改 HAProxy 的配置文件,让其支持 https :
frontend name(name 这里比如:http_server 和 main *:5000 等)
        bind 0.0.0.0:80
        bind 0.0.0.0:443 ssl crt /etc/haproxy/keys/www.test.com.pem
只需要在 frontend 这里添加一行配置(监听 443 端口,再告诉 HAProxy 存放 CA 证书的位置)即可。
www.test.com.pem 这个文件应该需要如下形式,即把 key 也要附上:
-----BEGIN CERTIFICATE-----
BAQDAgEGM798a1UdEwEB/wQIMAYBAf8CAQAQMKYIKwYBBQUHAQEEJzAlMCMGCCsG

...

k3YtCAbvmq==
-----END CERTIFICATE-----
-----BEGIN CERTIFICATE-----
IGZvciBhdXRob3JpemVkIHVz9zBvbmx5MS4wLAYDVSSDEyVFbnRydXN0IMAlcnRp

...

QnLcB=
-----END CERTIFICATE-----
-----BEGIN RSA PRIVATE KEY-----
SnXgfbEA3wLWqbjZiGkReyuxlZs+peS644u6+vnxTbmVHH+3t3rmubDK7nEACI81

...

cckLx6AQUD/7oUbcB9wKG5sy9EhYrCkg9wYYGyPlgUuRdLZny0I0Bw==
-----END RSA PRIVATE KEY-----
2 、修改 HAProxy 的配置文件,让其支持多个 https :
frontend name(name 这里比如:http_server 和 main *:5000 等)
        bind :80
        bind :443 ssl crt /etc/haproxy/keys/www.test.com.pem crt /etc/haproxy/keys/admin.test.com.pem crt /etc/haproxy/keys/passport.abc.com.pem
只需要连续不断地添加证书即可,HAProxy 会自动地根据不同的域名去使用相关的证书,不需要额外配置。
网上说 https 的配置要这么配:
frontend name(name 这里比如:http_server 和 main *:5000 等)
        bind :80
        bind :443 ssl crt /etc/haproxy/keys/www.test.com.pem crt /etc/haproxy/keys/admin.test.com.pem crt /etc/haproxy/keys/passport.abc.com.pem

        acl admintest_com hdr_dom(host) -i admin.test.com
        use_backend admin_test_com if admintest_com { ssl_fc_sni admin.test.com }

        acl passportabc_com hdr_dom(host) -i passport.abc.com
        use_backend pasport_abc_com if passport_abc_com { ssl_fc_sni passport.abc.com }

...
即在 use_backend 的后面还要添加 { ssl_fc_sni admin.test.com } ,表示 “ 指定 ” (或者说是强制)使用某个证书。其实这么做的话这个域名就没法通过 80 端口来访问了,只能通过 443 端口来访问。要想 443 端口和 80 端口都能同时访问还需要这么做:
frontend name(name 这里比如:http_server 和 main *:5000 等)
        bind :80
        bind :443 ssl crt /etc/haproxy/keys/www.test.com.pem crt /etc/haproxy/keys/admin.test.com.pem crt /etc/haproxy/keys/passport.abc.com.pem

        acl admintest_com hdr_dom(host) -i admin.test.com
        use_backend admin_test_com if admintest_com

        acl admintest_com hdr_dom(host) -i admin.test.com
        use_backend admin_test_com if admintest_com { ssl_fc_sni admin.test.com }

        acl passportabc_com hdr_dom(host) -i passport.abc.com
        use_backend pasport_abc_com if passport_abc_com

        acl passportabc_com hdr_dom(host) -i passport.abc.com
        use_backend pasport_abc_com if passport_abc_com { ssl_fc_sni passport.abc.com }

...
即再添加一个不 “ 指定 ” 证书的配置。
这么做我觉得完全没有必要,只要添加 bind :443 ssl crt /etc/haproxy/keys/www.test.com.pem … 这一行配置就行,剩下的让 HAProxy 自动地根据不同的域名去使用相关的证书即可。
3 、301 永久重定向和 302 临时重定向在 HAProxy 上的配置:
现有如下需求,将一个链接根据规则重定向到另一个链接:
- http://www.test.com/m 和 https://www.test.com/m → https://www.test.com/m/home
- http://www.test.com/m/ 和 https://www.test.com/m/ → https://www.test.com/m/home
- 但是 https://www.test.com/m/XXXX 不做重定向,XXXX 为任意字符
# 301 永久重定向
acl website_test hdr_reg(host) -i ^(www.test.com)$
acl url_m path_reg -i ^(/m|/m/)$
redirect code 301 location https://www.test.com/m/home if website_test url_m

# 302 临时重定向
acl website_test hdr_reg(host) -i ^(www.test.com)$
acl url_m path_reg -i ^(/m|/m/)$
redirect code 302 location https://www.test.com/m/home if website_test url_m
如需了解《 301 永久重定向和 302 临时重定向的区别》请点击这里。
4 、修改 HAProxy 的配置文件,在用户访问相关 http 的域名时强制切换到 https :
# 对以下站点进行 https 跳转

acl ssl hdr_reg(host) -i ^(www.test.com|admin.test.com|passport.abc.com)$
redirect scheme https code 301 if !{ ssl_fc } ssl
5 、现有如下需求,如果是移动端来访问首页则跳转到移动端的首页(仅对首页做跳转),PC 等其他终端访问首页不做任何跳转:
- https://www.test.com( mobile )→ https://www.test.com/m/index.jsp
acl website_test hdr_reg(host) -i ^(www.test.com)$
acl website_home_page path_reg -i ^/$
acl ua hdr_reg(User-Agent) -i UCBrowser|Android|Iphone|ipad|ipod|BlackBerry|Windows\ Phone|Symbian(.*)Series60/3|Symbian(.*)Series60/5
redirect code 302 location https://www.test.com/m/index.jsp if website_test website_home_page ua
6 、现有如下需求,如果是移动端来访问则跳转到移动端的页面(全站跳转),PC 等其他终端访问不做任何跳转:
- https://www.test.com( mobile )→ https://www.test.com/m/
- https://www.test.com/XXXX( mobile )→ https://www.test.com/m/XXXX
- XXXX 为任意字符
acl website_test hdr_reg(host) -i ^(www.test.com)$
acl website_m path_reg -i ^(/m/)
acl ua hdr_reg(User-Agent) -i UCBrowser|Android|Iphone|ipad|ipod|BlackBerry|Windows\ Phone|Symbian(.*)Series60/3|Symbian(.*)Series60/5
redirect prefix https://www.test.com/m if website_test ua !website_m
7 、现有如下需求,如果是移动端来访问,同时 cookies 值 abtest 等于 1 则跳转到一个链接,abtest 不等于 1 又跳转到另一个链接(仅对首页做跳转);PC 等其他终端访问首页不做任何跳转:
- https://www.test.com( mobile ,abtest = 1 )→ https://www.test.com/m/home
- https://www.test.com( mobile ,abtest != 1 )→ https://www.test.com/m/index.jsp
acl website_test hdr_reg(host) -i ^(www.test.com)$
acl website_home_page path_reg -i ^/$
acl ua hdr_reg(User-Agent) -i UCBrowser|Android|Iphone|ipad|ipod|BlackBerry|Windows\ Phone|Symbian(.*)Series60/3|Symbian(.*)Series60/5
acl abtest hdr_sub(cookie) abtest=1
redirect code 302 location https://www.test.com/m/home if website_test website_home_page ua abtest
redirect code 302 location https://www.test.com/m/index.jsp if website_test website_home_page ua !abtest
8 、现有如下需求:
- 如果是移动端来访问首页( http://www.test.com 或者 https://www.test.com ),均跳转至移动端的首页 https://www.test.com/m/ ;
- 如果是任意设备访问 http://www.test.com/m/ 开头的链接( 即移动端的所有页面,如移动端的首页 http://www.test.com/m/ 或者 http://www.test.com/m/XXXX ),均跳转至 https://www.test.com/m/ 开头的链接;
- 如果是移动端来访问 http://www.test.com/article- 或者 https://www.test.com/article- 开头的链接(如 http://www.test.com/article-XXXX ),均跳转至 https://www.test.com/m/article- 开头的链接。
即:
- http://www.test.com( mobile )→ https://www.test.com/m/
- https://www.test.com( mobile )→ https://www.test.com/m/
- http://www.test.com/m/ → https://www.test.com/m/
- http://www.test.com/m/XXXX → https://www.test.com/m/XXXX
- http://www.test.com/article-XXXX( mobile )→ https://www.test.com/m/article-XXXX
- https://www.test.com/article-XXXX( mobile )→ https://www.test.com/m/article-XXXX
- XXXX 为任意字符
acl website_test hdr_reg(host) -i ^(www.test.com)$
acl website_home_page path_reg -i ^/$
acl ua hdr_reg(User-Agent) -i UCBrowser|Android|Iphone|ipad|ipod|BlackBerry|Windows\ Phone|Symbian(.*)Series60/3|Symbian(.*)Series60/5
acl url_article path_reg -i ^/article-
acl url_m path_beg -i /m/

redirect code 302 location https://www.test.com/m/ if ua website_test website_home_page
redirect code 302 prefix https://www.test.com if website_test url_m !{ ssl_fc }
redirect code 302 prefix https://www.test.com/m if ua website_test url_article
9 、关于证书配置的安全性改进:
bind 0.0.0.0:443 ssl crt 1.pem no-sslv3 ciphers AES:ALL:!aNULL:!eNULL:-RC4:-EXPORT:-DES crt 2.pem no-sslv3 ciphers AES:ALL:!aNULL:!eNULL:-RC4:-EXPORT:-DES
10 、健康监测:
( 1 )基于端口的健康监测,这种检测方式只会去检查后端服务器的端口是否存活,并不能保证服务的真正可用:
option httpchk
( 2 )基于页面的健康监测,这种检测方式会去 GET 后端服务器的一个 web 页面,基本上可以代表后端服务的可用性:
option httpchk GET /check.html
( 3 )基于页面的健康监测,与( 2 )类似,但后端服务器只允许通过 www.test.com 这个域名去访问健康监测的页面:
option httpchk HEAD /check.jsp HTTP/1.1\r\nHost:\ www.test.com
11 、开启 HAProxy 的监控后台和隐藏 HAProxy 的版本号:
frontend  status
        bind 0.0.0.0:8080    # 监控后台所使用的端口号
        mode http            # 监控后台使用 http 协议
        stats enable
        stats  uri  /monitor    # 访问监控后台所使用的 URI
        stats auth admin:admin  # 登录监控后台所用到的用户名和密码
        stats hide-version   # 隐藏 HAProxy 的版本号
        stats admin if TRUE  # 管理界面,如果认证成功了可通过 WebUI 管理节点
        stats  refresh  30s  # 监控后台的页面每 30 s 刷新一次
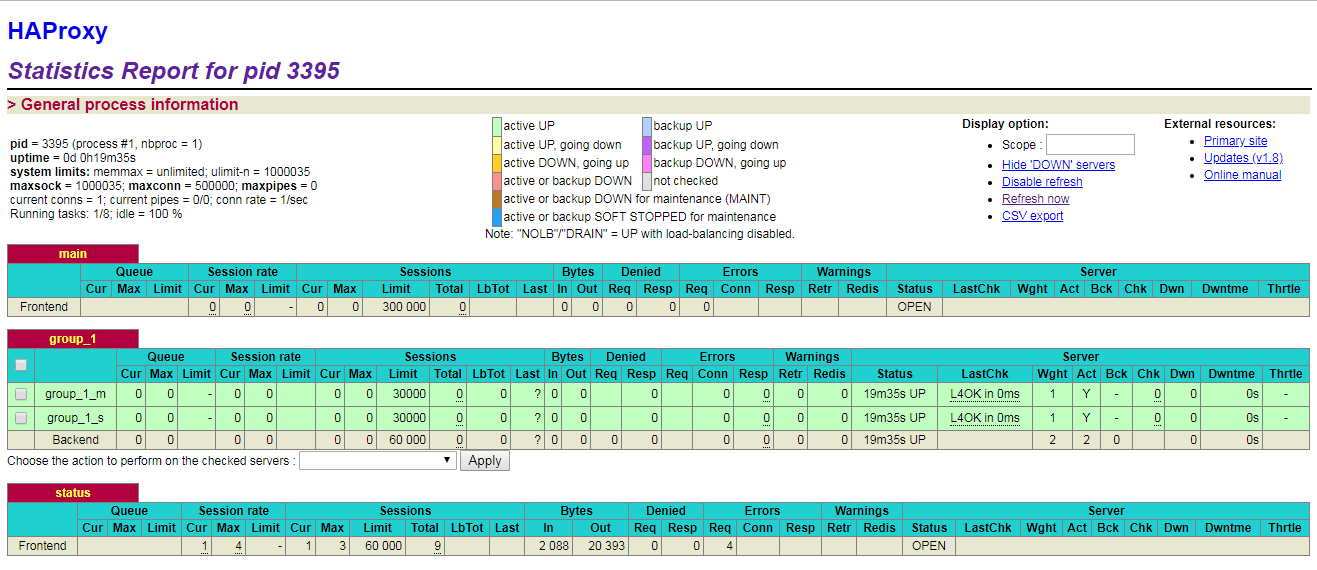
访问 http://x.x.x.x:8080/monitor ,输入用户名 admin 和密码 admin 即可进入 HAProxy 的监控后台,监控后台如下图所示:
12 、开启 HAProxy 的日志记录:
( 1 )HAProxy 日志输出级别有 local0 ~ local7 ,16 ~ 23 保留为本地使用:
- emerg 0 :系统不可用
- alert 1 :必须马上采取行动的事件
- crit 2 :关键的事件
- err 3 :错误事件
- warning 4 :警告事件
- notice 5 :普通但重要的事件
- info 6 :有用的信息
- debug 7 :调试信息
( 2 )修改配置文件 haproxy.conf :
在 defaults 下方添加以下内容:

defaults

......

log global
option httplog
log 127.0.0.1 local3
( 3 )修改配置文件 /etc/rsyslog.conf :
在文件末尾添加以下内容:

local3.* /www/accesslog/haproxy.log
以 CentOS Linux release 7.0.1406 (Core) 为例,完整的 /etc/rsyslog.conf 配置文件如下所示,请确保红色标识出来的配置是已经配置和配置正确的:
[root@host ~]# cat /etc/rsyslog.conf
#rsyslog v3 config file

# if you experience problems, check
# http://www.rsyslog.com/troubleshoot for assistance

#### MODULES ####

$ModLoad imuxsock.so    # provides support for local system logging (e.g. via logger command)
$ModLoad imklog.so      # provides kernel logging support (previously done by rklogd)
#$ModLoad immark.so     # provides --MARK-- message capability

# Provides UDP syslog reception
$ModLoad imudp.so
$UDPServerRun 514

# Provides TCP syslog reception
#$ModLoad imtcp.so
#$InputTCPServerRun 514


#### GLOBAL DIRECTIVES ####

# Use default timestamp format
$ActionFileDefaultTemplate RSYSLOG_TraditionalFileFormat

# File syncing capability is disabled by default. This feature is usually not required,
# not useful and an extreme performance hit
#$ActionFileEnableSync on


#### RULES ####

# Log all kernel messages to the console.
# Logging much else clutters up the screen.
#kern.*                                                 /dev/console

# Log anything (except mail) of level info or higher.
# Don't log private authentication messages!
# 如果以下配置不添加 local3.none ,那么 haproxy 的日志也会再写一份到 /var/log/messages ...
*.info;mail.none;authpriv.none;cron.none;local3.none                /var/log/messages

# The authpriv file has restricted access.
authpriv.*                                              /var/log/secure

# Log all the mail messages in one place.
mail.*                                                  -/var/log/maillog


# Log cron stuff
cron.*                                                  /var/log/cron

# Everybody gets emergency messages
*.emerg                                                 *

# Save news errors of level crit and higher in a special file.
uucp,news.crit                                          /var/log/spooler

# Save boot messages also to boot.log
local7.*                                                /var/log/boot.log


# ### begin forwarding rule ###
# The statement between the begin ... end define a SINGLE forwarding
# rule. They belong together, do NOT split them. If you create multiple
# forwarding rules, duplicate the whole block!
# Remote Logging (we use TCP for reliable delivery)
#
# An on-disk queue is created for this action. If the remote host is
# down, messages are spooled to disk and sent when it is up again.
#$WorkDirectory /var/spppl/rsyslog # where to place spool files
#$ActionQueueFileName fwdRule1 # unique name prefix for spool files
#$ActionQueueMaxDiskSpace 1g   # 1gb space limit (use as much as possible)
#$ActionQueueSaveOnShutdown on # save messages to disk on shutdown
#$ActionQueueType LinkedList   # run asynchronously
#$ActionResumeRetryCount -1    # infinite retries if host is down
# remote host is: name/ip:port, e.g. 192.168.0.1:514, port optional
*.* @@remote-host:514
local3.*   /www/accesslog/haproxy.log

# ### end of the forwarding rule ###
[root@host ~]#
( 4 )修改配置文件 /etc/sysconfig/rsyslog :
把 SYSLOGD_OPTIONS="-m 0"
改成 SYSLOGD_OPTIONS="-m 0 -r -x"
以 CentOS Linux release 7.0.1406 (Core) 为例,完整的 /etc/sysconfig/rsyslog 配置文件如下所示,请确保红色标识出来的配置是已经配置和配置正确的:
[root@host ~]# cat /etc/sysconfig/rsyslog
# Options for rsyslogd
# Syslogd options are deprecated since rsyslog v3.
# If you want to use them, switch to compatibility mode 2 by "-c 2"
# See rsyslogd(8) for more details
SYSLOGD_OPTIONS="-m 0 -r -x"
[root@host ~]#
相关解释说明:
- -r :打开接受外来日志消息的功能,其监控 UDP 514 端口;
- -x :关闭自动解析对方日志服务器的 FQDN 信息,这能避免 DNS 不完整所带来的麻烦;
- -m :修改 syslog 的内部 mark 消息写入间隔时间( 0 为关闭),例如 240 为每隔 240 分钟写入一次 ” –MARK– ” 信息;
- -h :默认情况下,syslog 不会发送从远端接收过来的消息到其他主机,而使用该选项,则把该开关打开,所有接收到的信息都可根据 syslog.conf 中定义的 @ 主机转发过去。
( 5 )配置完毕后重启 rsyslog 和 HAProxy 即可,日志内容如下所示:
Sep 18 15:48:11 localhost haproxy[12124]: Proxy html-server started.
Sep 18 15:48:11 localhost haproxy[12124]: Proxy html-server started.
Sep 18 15:48:29 localhost haproxy[12125]: 10.69.112.139:59244 [18/Sep/2016:15:48:29.027] http-in html-server/html-A 0/0/0/0/0 200 254 - - --NI 0/0/0/0/0 0/0 "GET / HTTP/1.1"
Sep 18 15:48:29 localhost haproxy[12125]: 10.69.112.139:59244 [18/Sep/2016:15:48:29.027] http-in html-server/html-A 0/0/0/0/0 200 254 - - --NI 0/0/0/0/0 0/0 "GET / HTTP/1.1"
Sep 18 15:48:29 localhost haproxy[12125]: 10.69.112.139:59244 [18/Sep/2016:15:48:29.027] http-in html-server/html-A 0/0/0/0/0 200 254 - - --NI 0/0/0/0/0 0/0 "GET / HTTP/1.1"
13 、自定义 HAProxy 的日志输出内容和格式:
修改配置文件 haproxy.conf 即可:
在 frontend 下方添加以下内容:

frontend name(name 这里比如:http_server 和 main *:5000 等)
	capture request header Host len 64
	capture request header User-Agent len 128
	capture request header X-Forwarded-For len 100
	capture request header Referer len 200
	capture response header Server len 40
	capture response header Server-ID len 40

	log-format %ci:%cp\ %si:%sp\ %B\ %U\ %ST\ %r\ %b\ %f\ %bi\ %hrl\ %hsl\
日志内容如下所示:
Sep 20 17:06:12 localhost haproxy[16372]: 10.69.112.139:39957 10.69.112.148:80 2614 179 200 GET / HTTP/1.1 html-server http-in 10.69.112.151 www.qiang999.com curl/7.19.7 (x86_64-redhat-linux-gnu) libcurl/7.19.7 NSS/3.19.1 Basic ECC zlib/1.2.3 libidn/1.18 libssh2/1.4.2 - - nginx/1.9.8 -\
Sep 20 17:06:12 localhost haproxy[16372]: 10.69.112.139:39957 10.69.112.148:80 2614 179 200 GET / HTTP/1.1 html-server http-in 10.69.112.151 www.qiang999.com curl/7.19.7 (x86_64-redhat-linux-gnu) libcurl/7.19.7 NSS/3.19.1 Basic ECC zlib/1.2.3 libidn/1.18 libssh2/1.4.2 - - nginx/1.9.8 -\
Sep 20 17:06:12 localhost haproxy[16372]: 10.69.112.139:39966 10.69.112.150:80 254 179 200 GET / HTTP/1.1 html-server http-in 10.69.112.151 www.qiang999.com curl/7.19.7 (x86_64-redhat-linux-gnu) libcurl/7.19.7 NSS/3.19.1 Basic ECC zlib/1.2.3 libidn/1.18 libssh2/1.4.2 - - nginx/1.9.8 -\
Sep 20 17:06:12 localhost haproxy[16372]: 10.69.112.139:39966 10.69.112.150:80 254 179 200 GET / HTTP/1.1 html-server http-in 10.69.112.151 www.qiang999.com curl/7.19.7 (x86_64-redhat-linux-gnu) libcurl/7.19.7 NSS/3.19.1 Basic ECC zlib/1.2.3 libidn/1.18 libssh2/1.4.2 - - nginx/1.9.8 -\
Sep 20 17:06:13 localhost haproxy[16372]: 10.69.112.139:39974 10.69.112.148:80 2614 179 200 GET / HTTP/1.1 html-server http-in 10.69.112.151 www.qiang999.com curl/7.19.7 (x86_64-redhat-linux-gnu) libcurl/7.19.7 NSS/3.19.1 Basic ECC zlib/1.2.3 libidn/1.18 libssh2/1.4.2 - - nginx/1.9.8 -\
接下来是配置的解释说明部分:
HAProxy 可利用 capture 捕获请求( request )和响应( response )中的头部信息:
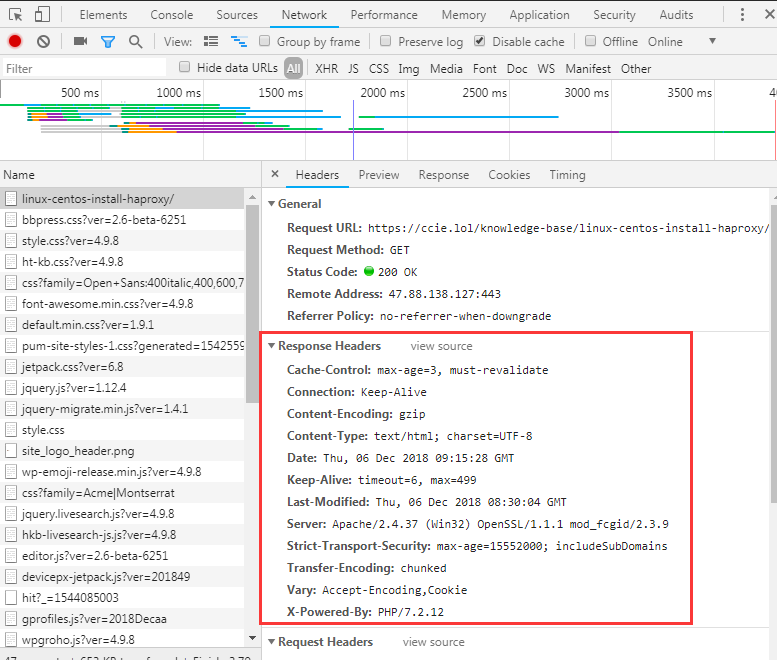
比如找到 Response Headers 这一栏,这里就是你可以捕获的信息。比如捕获其中的 Server 这个头部:
capture response header Server len 40
log-format 的自定义变量如下所示(转自官方文档):
 +---+------+-----------------------------------------------+-------------+
  | R | var  | field name (8.2.2 and 8.2.3 for description)  | type        |
  +---+------+-----------------------------------------------+-------------+
  |   | %o   | special variable, apply flags on all next var |             |
  +---+------+-----------------------------------------------+-------------+
  |   | %B   | bytes_read           (from server to client)  | numeric     |
  | H | %CC  | captured_request_cookie                       | string      |
  | H | %CS  | captured_response_cookie                      | string      |
  |   | %H   | hostname                                      | string      |
  | H | %HM  | HTTP method (ex: POST)                        | string      |
  | H | %HP  | HTTP request URI without query string (path)  | string      |
  | H | %HQ  | HTTP request URI query string (ex: ?bar=baz)  | string      |
  | H | %HU  | HTTP request URI (ex: /foo?bar=baz)           | string      |
  | H | %HV  | HTTP version (ex: HTTP/1.0)                   | string      |
  |   | %ID  | unique-id                                     | string      |
  |   | %ST  | status_code                                   | numeric     |
  |   | %T   | gmt_date_time                                 | date        |
  |   | %Tc  | Tc                                            | numeric     |
  |   | %Td  | Td = Tt - (Tq + Tw + Tc + Tr)                 | numeric     |
  |   | %Tl  | local_date_time                               | date        |
  | H | %Tq  | Tq                                            | numeric     |
  | H | %Tr  | Tr                                            | numeric     |
  |   | %Ts  | timestamp                                     | numeric     |
  |   | %Tt  | Tt                                            | numeric     |
  |   | %Tw  | Tw                                            | numeric     |
  |   | %U   | bytes_uploaded       (from client to server)  | numeric     |
  |   | %ac  | actconn                                       | numeric     |
  |   | %b   | backend_name                                  | string      |
  |   | %bc  | beconn      (backend concurrent connections)  | numeric     |
  |   | %bi  | backend_source_ip       (connecting address)  | IP          |
  |   | %bp  | backend_source_port     (connecting address)  | numeric     |
  |   | %bq  | backend_queue                                 | numeric     |
  |   | %ci  | client_ip                 (accepted address)  | IP          |
  |   | %cp  | client_port               (accepted address)  | numeric     |
  |   | %f   | frontend_name                                 | string      |
  |   | %fc  | feconn     (frontend concurrent connections)  | numeric     |
  |   | %fi  | frontend_ip              (accepting address)  | IP          |
  |   | %fp  | frontend_port            (accepting address)  | numeric     |
  |   | %ft  | frontend_name_transport ('~' suffix for SSL)  | string      |
  |   | %lc  | frontend_log_counter                          | numeric     |
  |   | %hr  | captured_request_headers default style        | string      |
  |   | %hrl | captured_request_headers CLF style            | string list |
  |   | %hs  | captured_response_headers default style       | string      |
  |   | %hsl | captured_response_headers CLF style           | string list |
  |   | %ms  | accept date milliseconds (left-padded with 0) | numeric     |
  |   | %pid | PID                                           | numeric     |
  | H | %r   | http_request                                  | string      |
  |   | %rc  | retries                                       | numeric     |
  |   | %rt  | request_counter (HTTP req or TCP session)     | numeric     |
  |   | %s   | server_name                                   | string      |
  |   | %sc  | srv_conn     (server concurrent connections)  | numeric     |
  |   | %si  | server_IP                   (target address)  | IP          |
  |   | %sp  | server_port                 (target address)  | numeric     |
  |   | %sq  | srv_queue                                     | numeric     |
  | S | %sslc| ssl_ciphers (ex: AES-SHA)                     | string      |
  | S | %sslv| ssl_version (ex: TLSv1)                       | string      |
  |   | %t   | date_time      (with millisecond resolution)  | date        |
  |   | %ts  | termination_state                             | string      |
  | H | %tsc | termination_state with cookie status          | string      |
  +---+------+-----------------------------------------------+-------------+
- HAProxy 日志配置部分转自:http://blog.51cto.com/eric1/1854574
发表评论?